Jenkins installation
In this article, I will guide you through the installation process of Jenkins CI tool. The guide and steps on this page are for new installations of Jenkins on a single/local machine.
Jenkins is typically run as a standalone application in its own process with the built-in Java servlet container/application server (Jetty).

Jenkins can also be run as a servlet in different Java servlet containers such as Apache Tomcat or GlassFish.
Note: Although this article focusses on local installations of Jenkins, this steps/method can also be used to help set up Jenkins in production environments.
Prerequisites to set-up Jenkins manually
Minimum hardware requirements: 256 MB of RAM 1 GB of drive space (although 10 GB is a recommended minimum if running Jenkins as a Docker container)
Recommended hardware configuration for a small team: 1 GB+ of RAM 50 GB+ of drive space
Sofware requirements: Java 8 – either a Java Runtime Environment (JRE) or a Java Development Kit (JDK) is fine
Note: This is not a requirement if running Jenkins as a Docker container.
Jenkins can be installed on different platforms like Linux, Windows, and Mac through manual or using Docker images.
- Jenkins in Docker
- Jenkins in Ubuntu or Debian
- Jenkins in Windows
- Jenkins in Mac
- Solaris, OmniOS, SmartOS, and other siblings
Jenkins in Docker
Prerequisites to set-up Jenkins in Docker Ensure that Docker is installed and running on your local machine. (Docker install steps)
There are several Docker images of Jenkins available.
Method 1
The recommended Docker image to use is the jenkinsci/blueocean image (from the Docker Hub repository). This image contains the current Long-Term Support (LTS) release of Jenkins (which is production-ready) bundled with all Blue Ocean plugins and features. This means that you do not need to install the Blue Ocean plugins separately.
Following are the steps to setup jenkinsci/blueocean in Docker:
- Docker pull command
docker pull jenkinsci/blueocean - Run as Jenkin docker
docker run -p 8080:8080 jenkinsci/blueocean - Note the admin password dumped on log
- Open a browser on http://localhost:8080
- Run the initial setup wizard. Choose “recommended plugins”
- Browse to http://localhost:8080/blue
Method 2
For minimum Jenkins plugins, you can use jenkins/jenkins Jenkins Docker image.
Following are the steps to setup jenkins/jenkins in Docker:
- Docker pull command
docker pull jenkins/jenkins:lts - Run as Jenkin docker
docker run -p 8080:8080 -p 50000:50000 jenkins/jenkins:lts - Note the admin password dumped on log
- Open a browser on http://localhost:8080/
- Run the initial setup wizard. Choose “recommended plugins”. Browse to http://localhost:8080/blue
For details information click here.
Jenkins in Ubuntu or Debian
On Debian-based distributions, such as Ubuntu, you can install Jenkins through apt.
Follow below commands to install Jenkins in debian-based distributions.
$ wget -q -O - https://pkg.jenkins.io/debian/jenkins.io.key | sudo apt-key add -
$ sudo sh -c 'echo deb http://pkg.jenkins.io/debian-stable binary/ > /etc/apt/sources.list.d/jenkins.list'
$ sudo apt-get update
$ sudo apt-get install jenkins
Above commands will do the following.
- Setup Jenkins as a daemon launched on start. (/etc/init.d/Jenkins)
- Create a jenkins user to run this service.
- Direct console log output to the file /var/log/jenkins/jenkins.log. Check this file if you are troubleshooting Jenkins.
- Populate /etc/default/jenkins with configuration parameters for the launch, e.g JENKINS_HOME
- Set Jenkins to listen on port 8080. Access this port with your browser to start configuration.
Troubleshooting Jenkins installation:
If your /etc/init.d/jenkins file fails to start Jenkins, then edit the /etc/default/jenkins to replace the line —-HTTP_PORT=8080—- with —-HTTP_PORT=8081—- Here, “8081” was chosen but you can put another port available.
Jenkins in Windows
To install Jenkins in Windows OS, download latest package from website and follow instructions.
- Download the latest package.
- Open the package and follow the instructions
Jenkins in Mac
Following below steps to install Jenkins in Mac OS.
Method 1
To install from the website, using a package:
- Download the latest package.
- Open the package and follow the instructions
Method 2
Jenkins can also be installed using brew:
-
Install the latest release version
$ brew install jenkins -
Install the LTS version
brew install jenkins-lts
Solaris, OmniOS, SmartOS, and other siblings
Following are the general methods to install Jenkins on any platform.
It should suffice to install Java 8 installed on machine, download jenkins.war and run it as a standalone process or under an application server such as Apache Tomcat.
Jenkins post-installation setup wizard
After installing and running Jenkins using one of the procedures above, the post-installation setup wizard begins.
This setup wizard takes you through are a few quick “one-off” steps to unlock Jenkins, customize it with plugins and create the first administrator user through which you can continue accessing Jenkins.
Unlocking Jenkins
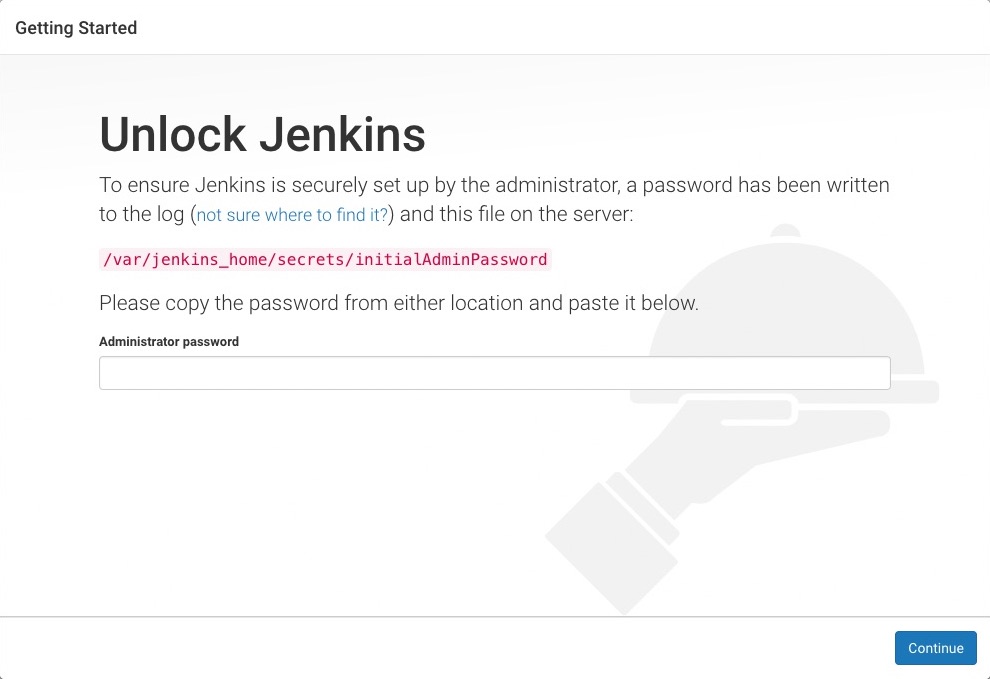
When you first access a new Jenkins instance, you are asked to unlock it using an automatically-generated password.
- Browse to http://localhost:8080/ (or whichever port you configured for Jenkins when installing it) and wait until the Unlock Jenkins page appears.

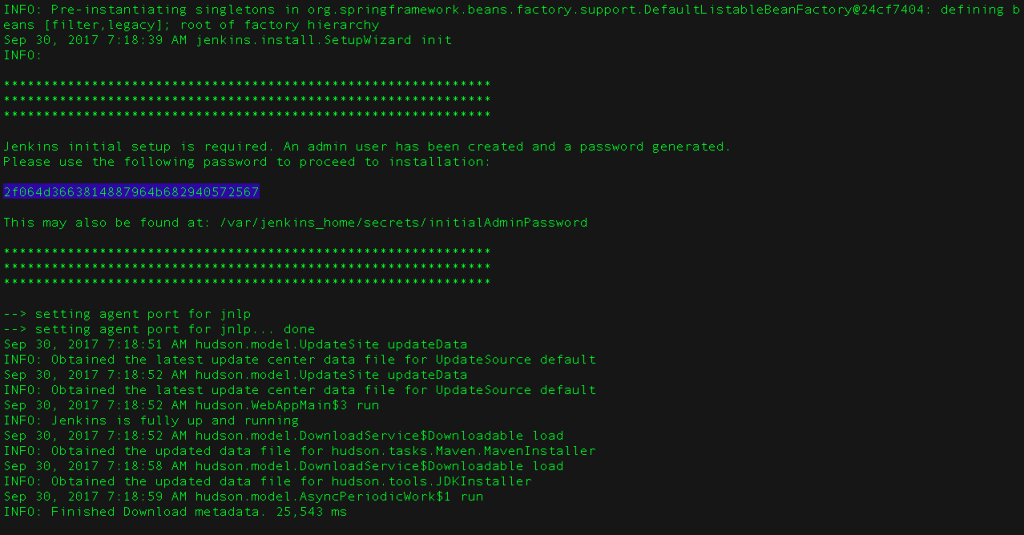
- From the Jenkins console log output, copy the automatically-generated alphanumeric password (between the 2 sets of asterisks).

- On the Unlock Jenkins page, paste this password into the Administrator password field and click Continue. Notes: If you ran Jenkins in Docker in detached mode, you can access the Jenkins console log from the Docker logs (above).
The Jenkins console log indicates the location (in the Jenkins home directory) where this password can also be obtained. This password must be entered in the setup wizard on new Jenkins installations before you can access Jenkins’s main UI. This password also serves as the default admininstrator account’s password (with username “admin”) if you happen to skip the subsequent user-creation step in the setup wizard.
